This tutorial shows how to automatically build and publish Python packages to a private repository using GitLab CI/CD. By the end, every tagged commit will trigger a pipeline that packages your code and uploads it to RepoForge.io.
Prerequisites
- A RepoForge.io account (free trial works for this tutorial)
- A GitLab account
- A recent version of Python 3
- Basic familiarity with git
Step 1 — Create the folder structure
Create an empty folder for your project and add a subfolder for your package code:
my_project/
  my_package/
    __init__.py
    ... your code goes here
Step 2 — Create pyproject.toml
Create the below pyproject.toml file in your my_project folder:
[build-system]
requires = ["setuptools>=61.0", "wheel"]
build-backend = "setuptools.build_meta"

[project]
name = "my_package"
version = "0.1.0"
description = "My Python package"
authors = [
    {name = "Your Name", email = "you@example.com"}
]
license = {text = "MIT"}
requires-python = ">=3.9"

[project.optional-dependencies]
dev = ["twine", "build"]
Note: If you have existing code using
setup.py, it will still work. However,pyproject.tomlis now the standard and recommended approach.
Step 3 — Build the package
Install the build tools and create your distribution files:
pip install build twine
python -m build
This creates a dist/ folder containing your package:
my_project/
  dist/
    my_package-0.1.0.tar.gz
    my_package-0.1.0-py3-none-any.whl
  my_package/
    __init__.py
  pyproject.toml
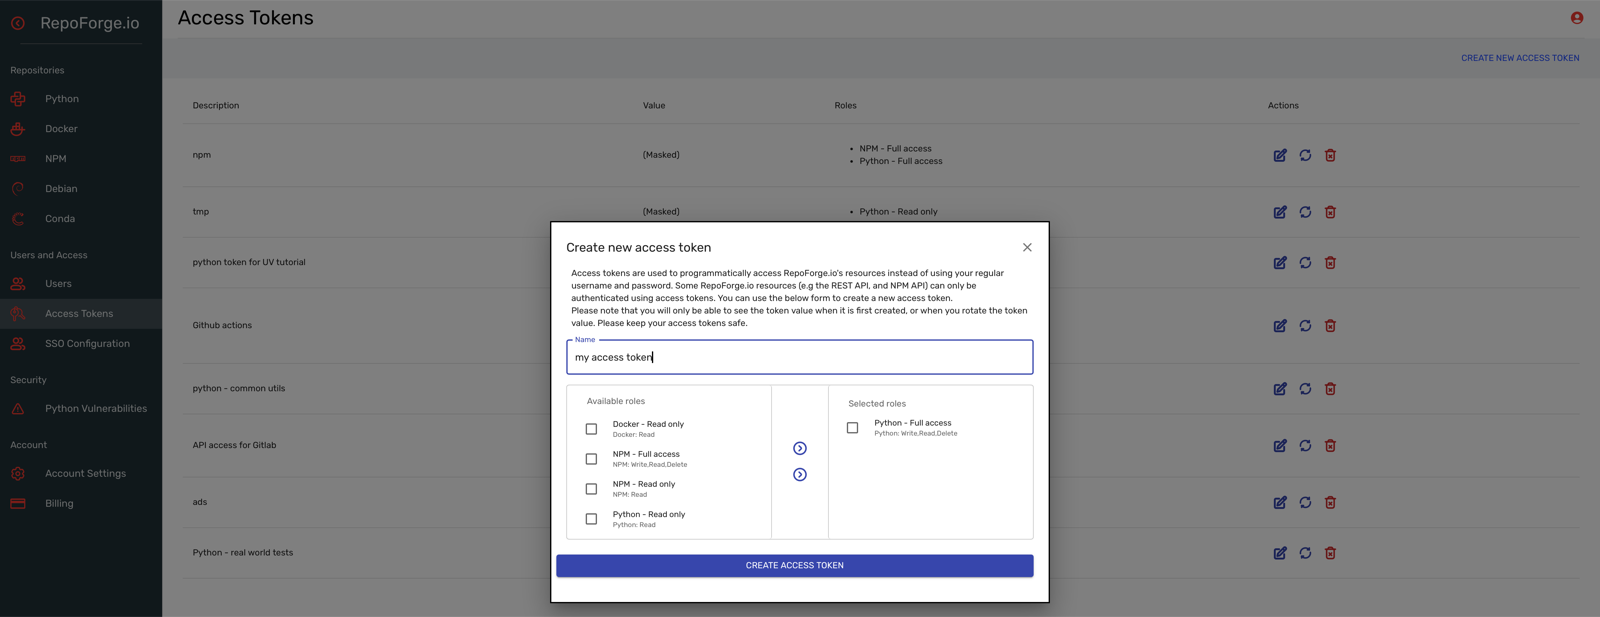
Step 4 — Create an access token in RepoForge.io
Before uploading, you need to create an access token for authentication.
- Log in to RepoForge.io. You’ll need to create an account if you haven’t already.
- Go to Access Tokens in the sidebar
- Click Create Access Token
- Give it a descriptive name (e.g., “GitLab CI”)
- Assign the role called Python - Full Access then click the Create Access Token button
- Copy the token value — you won’t be able to see it again
Step 5 — Test the upload locally
Next you’ll need to find your repository URL in the RepoForge.io dashboard. To do this, click on Python under Repositories at the top of the main left hand sidebar. Then click Show me how to publish packages in the top right hand corner.
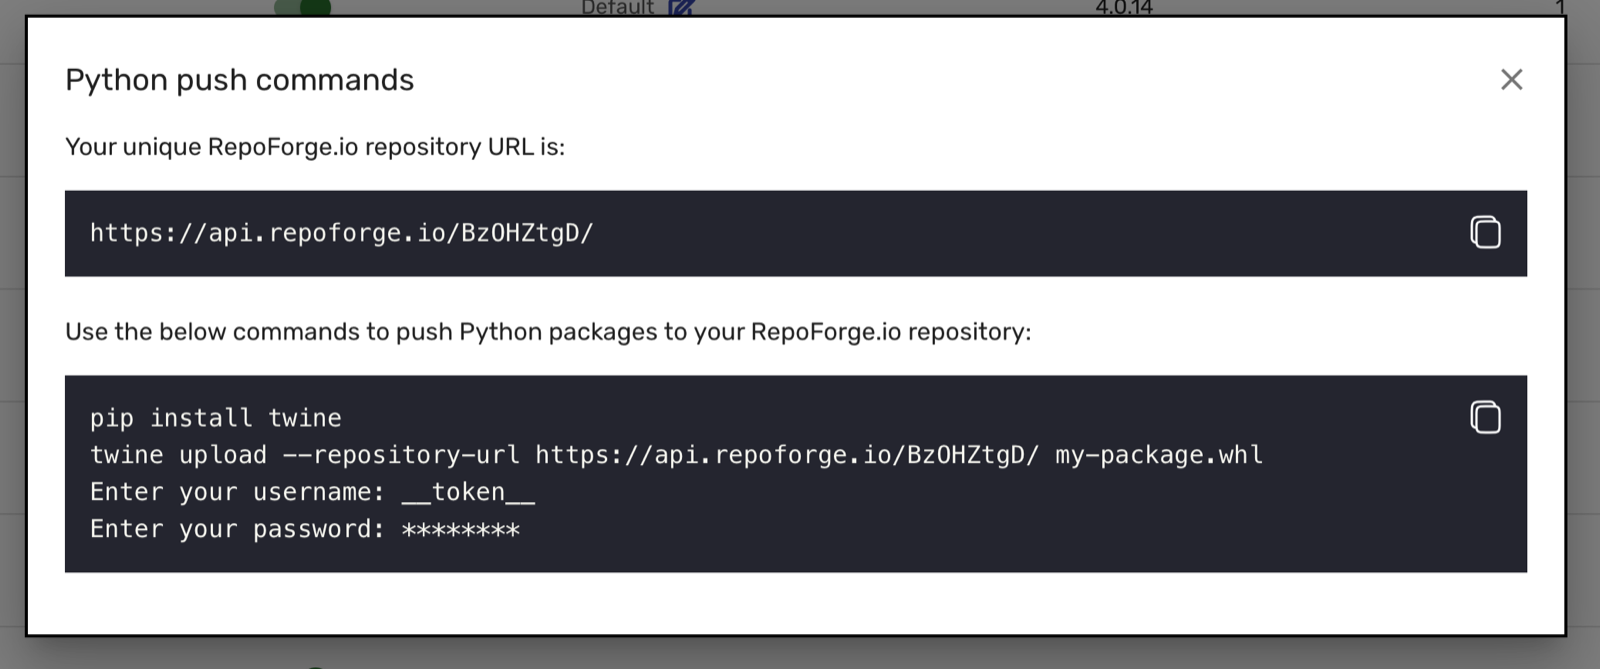
Test that everything works by uploading manually:
twine upload \
  --repository-url https://api.repoforge.io/your-unique-hash/ \
  -u __token__ \
  -p YOUR_ACCESS_TOKEN \
  dist/*
You should see output like:
Uploading distributions to https://api.repoforge.io/your-unique-hash/
Uploading my_package-0.1.0-py3-none-any.whl
100%|████████████████████████| 3.85k/3.85k [00:00<00:00, 8.83kB/s]
Uploading my_package-0.1.0.tar.gz
100%|████████████████████████| 3.38k/3.38k [00:00<00:00, 3.72kB/s]
Refresh the RepoForge.io dashboard to confirm the package appears.

Step 6 — Create a GitLab repository
Create a new project at https://gitlab.com/projects/new, then initialise your local repository:
git init
git remote add origin git@gitlab.com:your-username/my-project.git
Add a .gitignore to exclude build artifacts:
dist/
build/
*.egg-info/
__pycache__/
.venv/
Step 7 — Create the GitLab CI pipeline
Create .gitlab-ci.yml in your project root:
stages:
  - package

publish:
  stage: package
  image: python:3.13-alpine
  only:
    - tags
  script:
    - pip install build twine
    - python -m build
    - twine upload --non-interactive dist/*
The only: tags configuration means this job only runs when you push a git tag, not on every commit. The --non-interactive flag prevents twine from waiting for input in the CI environment.
Step 8 — Configure GitLab CI/CD variables
The pipeline needs credentials to upload to RepoForge.io. Twine reads these from environment variables automatically.
In GitLab, go to Settings → CI/CD → Variables and add:
| Variable | Value |
|---|---|
TWINE_REPOSITORY_URL | Your RepoForge.io Python repository URL |
TWINE_USERNAME | __token__ |
TWINE_PASSWORD | Your access token from Step 4 |
Mark TWINE_PASSWORD as masked to prevent it appearing in logs.
Step 9 — Use git tags for versioning
The pipeline only runs on tagged commits, and you should use these tags as version numbers. Update pyproject.toml to read the version dynamically:
[build-system]
requires = ["setuptools>=61.0", "wheel"]
build-backend = "setuptools.build_meta"

[project]
name = "my_package"
dynamic = ["version"]
description = "My Python package"
authors = [
    {name = "Your Name", email = "you@example.com"}
]
license = {text = "MIT"}
requires-python = ">=3.9"

[tool.setuptools.dynamic]
version = {attr = "my_package.__version__"}
Then set the version in your package’s __init__.py:
__version__ = "0.2.0"
Alternatively, for CI environments, you can use the CI_COMMIT_TAG environment variable. Update .gitlab-ci.yml:
stages:
  - package

publish:
  stage: package
  image: python:3.13-alpine
  only:
    - tags
  script:
    - pip install build twine
    - sed -i "s/version = \".*\"/version = \"$CI_COMMIT_TAG\"/" pyproject.toml
    - python -m build
    - twine upload --non-interactive dist/*
Step 10 — Push and deploy
Commit your changes, create a tag, and push:
git add .
git commit -m "Initial commit"
git tag 0.2.0
git push origin main --tags
The pipeline will trigger automatically. Check the GitLab CI/CD → Pipelines page to monitor progress. Once complete, the new version appears in RepoForge.io.
Troubleshooting
“Conflict for URL” error
RepoForge.io (like PyPI) doesn’t allow uploading the same version twice. Either:
- Delete the existing version in the dashboard and re-upload
- Increment the version number and push a new tag
Pipeline hangs waiting for input
Add --non-interactive to the twine command, or set the environment variable:
variables:
  TWINE_NON_INTERACTIVE: "1"
“403 Forbidden” or authentication errors
- Verify
TWINE_USERNAMEis set to__token__(not your email) - Check the access token has a role with Python write permissions
- Ensure the token hasn’t been rotated (invalidating the old value)
Package not found after upload
- Check you’re looking at the correct RepoForge.io account
- Verify the upload completed successfully in the pipeline logs
- Try refreshing the dashboard
Next steps
- Add tests to your pipeline before the publish stage
- Configure branch protection to control who can create tags